XtoCC (also called Project X₂7) allows you to take your Final Cut Pro event clips and/or project(s) directly to Adobe Premiere Pro CC or CS6, Adobe Audition CC, Adobe After Effects CC, Final Cut Pro 6, Final Cut Pro 7, or other Final Cut Pro 7 XML-based workflow tools.
Quick-start Guide
- In Final Cut Pro select the event(s) or project(s) you want to translate (Final Cut Pro 10.1.1 or earlier allows you to select only a single event or project). If you have Final Cut Pro and your destination app installed on different Macs or partitions, make sure all media are on an external storage device.
- Choose the File menu and select Export XML…, and name and save the .fcpxml file. If Final Cut Pro and your destination app are installed on different Macs or partitions, save the .fcpxml file to the external storage device.
IMPORTANT: Media must be fully imported before exporting XML. You can view the import progress in the Background Tasks window. - To translate the XML, either:
- run XtoCC and use the open dialog to locate your exported .fcpxml file;
- drag-and-drop the .fcpxml file onto the XtoCC application or dock icon;
- right-click on the .fcpxml file in Finder and choose Open With > XtoCC from the contextual menu.
- XtoCC displays a progress bar during XML translation and, when completed, asks you to name and save the new XML file.
For help with activating Project X₂7 or moving it to another computer, see this help page.
Please use Email Support under the Help menu for bug reports, feature requests or support. If you need to email an XML file, please zip the file and email it with a brief description of what happened.
Before exporting XML for XtoCC translation
It is strongly recommended that the media files are online (no “files missing” warnings in your Properties panel in the Inspector) and have identical media file paths (drive names, folder structures and file names). If working between two Macs, you may need to consolidate media to an external drive and reconnect any unconnected media before exporting XML. To avoid this issue Premiere Pro CC and Final Cut Pro may be installed on the same Mac.
If creating XML for a Windows computer, you will need to locate missing media after XML import because the description of file paths are different than on a Mac.
Compound clips are translated as nested sequences. However, the destination app importing Final Cut Pro 7 XML may not necessarily support nested sequences, such as Adobe Audition and After Effects. You can avoid this by breaking apart compound clips in a project into their original items. The easiest way to locate your compound clips is using the Timeline Index. In Final Cut Pro select multiple compound clips and choose Clip > Break Apart Clip Items before exporting the project XML from Final Cut Pro.
Starting with version 10.1.2, Final Cut Pro allows you to select an entire Library, one or more events, or one or more projects to be included in the exported XML. Whatever items are in the XML will be translated by XtoCC; the more items that are included, the larger the exported file will be and the longer it will take to translate. At the bottom of the Export XML dialog (above the Metadata View popup menu) the Source heading tells you what items will be included in the exported XML.
Workflow Options
Creating XML for Premiere Pro CC (Mac or Windows)
Premiere Pro automatically creates bin clips for any clips in an imported sequence. If you are translating projects into sequences for Premiere Pro, you may prefer to select one or more projects and have no event clips selected before exporting XML. XtoCC will translate the project(s) into sequence(s), and Premiere Pro will make the necessary clips on XML import. Search for “sequence” in the project panel to filter down to the sequences that were imported.
If you want to transfer only the keyworded clips in an event, select only the event containing the keyworded clips before exporting XML.
In Premiere Pro choose File > Import… to import the translated XML file. Premiere Pro may show a notice about the Translation Report: this report is added to the project and describes any translation issues while importing. On Windows you will need to locate missing media because the file paths are different than on a Mac.
If you’re translating a single project containing captions, XtoCC will save out a matching SRT file which can be imported into Premiere Pro and dragged into the sequence above the highest video track.
Creating XML for Audition CC (Mac or Windows)
In Final Cut Pro first break apart compound clips — see Before exporting XML for XtoCC translation for details. Select a single project before exporting XML (so it will translate into a single Sequence).
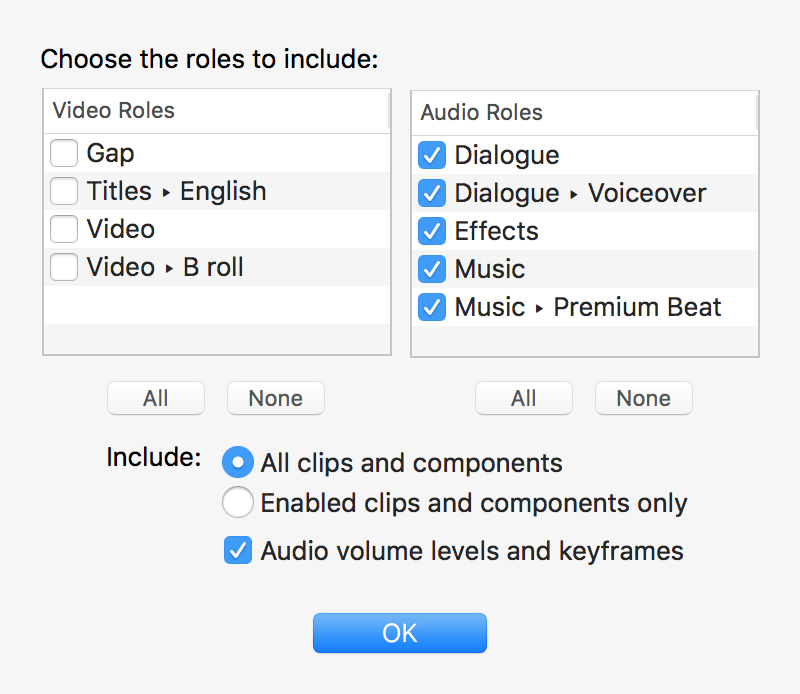
In XtoCC choose to save only audio roles. You can use the Audio Roles checkboxes to control the roles that will be transferred to Audition. For example, you may have temp music tagged with a Temp role in your timeline and don’t want it included in the Audition project.
For more control you can choose to include Enabled clips and components only and Audio volume levels and keyframes.
In Audition choose File > Import… to import the translated XML file. If you get an Interchange file does not contain any tracks error then you have exported compound clips or multiple projects from Final Cut Pro.
Audition interprets stereo clips as dual mono. To work around this issue, import the XML into Premiere Pro, then open the sequence and choose Edit > Edit in Adobe Audition > Sequence… to send the Premiere Pro sequence to Audition.
Creating XML for After Effects CC (Mac or Windows)
Note: After Effects version 17.0.5 or later does not import translated XML, but instead can import Premiere Pro projects directly — see https://helpx.adobe.com/after-effects/user-guide.html/after-effects/using/importing-effects-premiere-pro.ug.html for details.
In Final Cut Pro, first break apart compound clips — see Before exporting XML for XtoCC translation for details. Select a single project before exporting XML (so it will translate into a single Sequence).
In XtoCC choose to save both video and audio roles. You may wish to use the Video Roles checkboxes to control which clips are sent to After Effects. For example, you might have assigned a VFX role to the clips you want to work with in After Effects. By selecting only the VFX role checkbox, you will simplify your After Effects Composition to only the clips tagged with the VFX role.
For more control you can choose to include Enabled clips and components only.
In After Effects choose File > Import > Pro Import After Effects… to import the translated XML file. If you get a No sequence found in XML to import error then you have exported more than a single project from Final Cut Pro.
Creating XML for Final Cut Pro 7
In Final Cut Pro 7 you cannot nest sequences with different editing timebases. If you have compound clips with frame rates different from the project’s frame rate, the translated nested sequences will be ignored by Final Cut Pro 7 during import. If in doubt, the safe option is to break apart compound clips before exporting XML — see Before exporting XML for XtoCC translation for details.
Final Cut Pro 7 supports a maximum of 99 audio tracks. You may prevent exceeding this limit by changing the Preference to Minimum number of Tracks.
If you want to transfer only the keyworded clips in an event, select only the event containing the keyworded clips before exporting XML.
In Final Cut Pro 6 or 7, choose File > Import > XML… to import the translated XML file.
What translates?
Here’s a list of what happens during translation.
- For event clips, a bin named after the event is created containing all the master clips, and bins named for each keyword, favorite or rejected range are created containing subclips representing these ranges. The keyword’s Notes are added to the subclip’s Log Note field.
- For projects, video clips and stills in the primary storyline become clips in track V1; audio clips in the primary storyline become clips in tracks A1 etc; connected clips and clips in secondary storylines are added to higher numbered video and audio tracks. If there are video clips connected directly below the primary storyline these become track V1 below primary storyline clips in track V2, while lower video clips become disabled clips in higher numbered video tracks.
- Gap clips become empty spaces in the track.
- The starting timecode of the project and its settings are maintained.
- Event synchronized clips and compound clips become bin sequences.
- Compound clips in a project become nested sequences.
- Synchronized clips in a project are translated to merged clips.
- Notes are added to the clip’s Log Note field, Roles to the Description field, Scene information to the Scene field, and Take information to the Shot/Take field. Track(s) are created for each Role/Subrole, and if importing into PPro then each track is named after the Role/Subrole that it represents.
- Standard markers become blue markers in Final Cut Pro 7; unfinished to-do markers become red markers; completed to-do markers become green markers; and chapter markers become yellow markers. Marker colors are not supported by Creative Cloud apps or Final Cut Pro 6.
- Split edits (J/L cuts) are preserved.
- The enabled/disabled state (Clip > Disable) of each clip and its audio components is maintained, including channels disabled in the Inspector’s Channel Configuration.
- Constant speed changes are preserved. Speed changed clips may have their in/out points slipped by a frame or two.
- Transform (Position, Rotation, Scale), Crop (Trim or Crop), Distort, Opacity and their keyframes are translated; opacity fade in and fade out handles are recreated using opacity keyframes. (Keyframes are only translated for 10.1.2 and later.)
- Audio volume and pan and their keyframes on a whole clip are added to all audio tracks; fade in and fade out handles are recreated using audio level keyframes. Audio volume and pan and their keyframes on individual audio components are added to their appropriate audio tracks.
- Subtract, Darken, Multiply, Add, Lighten, Screen, Overlay, Soft Light, Hard Light and Difference blend modes become their equivalent composite modes. Other Blend Modes are not supported in Final Cut Pro 7 XML.
- Cross Dissolve, Zoom, Flash, Lens Flare, Black Hole, Flip, Page Curl, Ripple, Swing, Cube, Doorway, Squares, Star, Band, Center, Checker, Clock, Gradient, Inset, Letter X and Wipe transitions are substituted with equivalents; other transitions become Cross Dissolve; audio transitions become Cross Fades. (Custom settings are not translated — transitions apply with default settings.)
What loses something in translation?
- Auditions are automatically “finalized” (there’s no equivalent to auditions in Final Cut Pro 7).
- Multicam clips are flattened/collapsed to the clips from the active angle(s).
- Titles become Outline Text titles containing the original text. Some titles with complex builds may have the text out of order in the Text title.
Note: For FCPX 10.0.9 and earlier font, size, style and color information is not available. - Custom generator becomes a Color solid but other Generators (except Gaps) become Slugs named after the Final Cut Pro generator.
What doesn’t get translated?
The translation from Final Cut Pro to Final Cut Pro 7 isn’t perfect. Here’s a list of what gets “lost in translation.”
- Keyframed speed changes are converted to a constant speed change that maintains the duration of the original clip and uses the average speed of the clip.
- Effects and Color.
- Transform Anchor and Crop (Ken Burns), Stabilization, Rolling Shutter, Spacial Conform.
- Transition settings.
Known Issues
- Carefully consider the media format of your video clips. For example, Final Cut Pro and Premiere Pro can support R3D clips directly, whereas Final Cut Pro 7 needs RED QuickTime Wrapper versions of the clips. Black video usually means that your NLE is missing a plug-in. If you’ve installed a Final Cut Pro plug-in to support your camera’s format, then you’ll need to download and install a version for Final Cut Pro 7 or Premiere Pro. (Import a clip directly into Final Cut Pro 7 or Premiere Pro to see if the camera format is supported.) The most reliable way to get media that works in Final Cut Pro 7, Premiere Pro and Final Cut Pro is to transcode to your favorite flavor of ProRes.
- Similarly, audio formats might not be supported by all apps. For example, the .caf format used by the Final Cut Pro and iLife Sound Effects included with Final Cut Pro is supported by Final Cut Pro 7 but is not supported by Premiere Pro.
- Adobe Audition or After Effects may produce an error attempting to import XML — for example, Interchange file does not contain any tracks or No sequence found in XML to import. Both Audition and After Effects can import only a single sequence, so ensure that you have selected only a single project (containing no compound clips) in Final Cut Pro before exporting XML for translation.
- Multicams of synchronized clips can be a problem. When working with multiple cameras and second system audio, it is better (and faster) to make a multicam of the video and audio as one step so that the second system audio is an angle. These will translate correctly.
- In some cases Premiere Pro will report that it cannot import a translated XML file — trashing the Premiere Pro preferences file solves the problem.
- If Scene and Take information aren’t included, be sure to choose General View from the Metadata View popup menu in the Export Final Cut XML dialog.
- Final Cut Pro 7 does not support H.264 footage from many modern cameras and prefers it to be transcoded to ProRes. In Final Cut Pro select the clips in the event and choose File > Transcode Media…, turn on the Create optimized media checkbox and click OK. After transcoding and translation, Final Cut Pro 7 will reconnect to the optimized ProRes 422 media instead of the original media, as long as the original media is stored in the event.
- Projects with 5K or larger resolution aren’t supported by Final Cut Pro 7 (Final Cut Pro 7 supports sequences up to 4096 pixels wide).
- Importing Final Cut Pro 7 XML to other applications (such as Premiere Pro or Smoke) might fail in some cases, even though the XML can be imported into Final Cut Pro 7. The work-around is to re-export XML from Final Cut Pro 7 and import it into the other application.
- In some cases the Sony XDCAM browser will automatically run XtoCC. The solution is to export an XML file from Final Cut Pro and in the Finder select the XML file and choose File > Get Info. In the Open with: area choose Final Cut Pro from the popup menu and click the Change All… button.
- In some cases clips may import offline. In Final Cut Pro 7 select the offline clips and choose File > Reconnect Media… This can sometimes happen because Final Cut Pro is more liberal with acceptable file types than Final Cut Pro 7. During reconnect Final Cut Pro 7 may warn you that the clip you want to connect to has a different reel name (since this didn’t carry over from Final Cut Pro). There have been cases where a file will simply not reconnect in Final Cut Pro 7 (or even import into a project) because of incompatible media. Find or create a new version of the media file(s) that Final Cut Pro 7 can open and reconnect to those.
- In cases where there is not enough media to cover a centered transition, the transition will be shorter than it was in Final Cut Pro.